Flutter Animations: Part 1
In a prior post, we talked about the new cross-platform mobile development framework from Google called Flutter. It reviews how Flutter took a different approach from React Native and NativeScript in creating a mobile application. Next, we're going to cover some key aspects of Flutter.
Over the past few weeks, our in-house development team has been diving into the basics of Flutter. We've decided not to cover the basics of using Flutter in this article because there are so many tutorials already out there.
Here are just a handful of free and paid options:
Free:
Paid:
- Flutter & Dart – The Complete Guide (IOS & Android Apps)
- Flutter & Dart – The Complete Flutter App Development Course
- Flutter – Intermediate
- Flutter – Advanced
Now, we are about to start on animations. For training, we were inspired by Anthony Robledo’s YouTube video overview of the animation options in Flutter. In that video, he breaks down the animations into three categories: implicit, transition, and explicit. He covers each one separately.
For this post, we'll talk about implicit animations. In future posts, we'll cover transition and explicit animations.
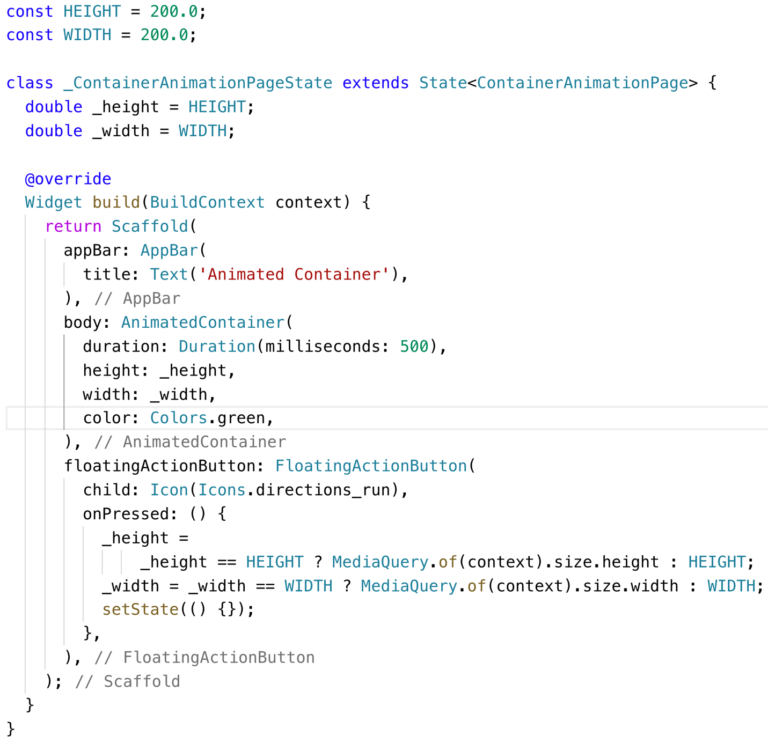
The implicit animation widgets derive from the abstract class ImplicitlyAnimatedWidget. These classes allow you to easily animate basics options, such as size, opacity, text style, position, etc. We won’t cover all of the implicit animation widgets, but you can find more details at docs.flutter.dev and at “Introduction to animations.” As with most implicit animation widgets, the AnimatedContainer widget syntax is very simple. The key part is the duration property. This is how long the animation will take to complete. With the duration set, any of the following container properties can be animated:
- Alignment
- Padding
- Color
- Decoration
- ForegroundDecoration
- Width
- Height
- Constraints
- Margin
- Transform
To keep it simple, we’ll only animate the height and width of the container.
In the code example below, the AnimatedContainer height and width are stored in state-level variables. When the height and width change, the widget will animate the change between the start and end height and width over a 500 milliseconds period.

Below you will find the full widget example.
When the Floating Action Button is clicked, the onPress function determines if the container should be 200 * 200 or should fill up the entire screen. When the setState function is called, the State widget will call the build function. When this happens the AnimatedContainer will resize itself over a period of 500 milliseconds.
In this article, we’ve just scratched the surface on Implicit animations. In Part 2, we’ll cover AnimatedDefaultTextStyle and AnimatedOpacity before moving on to Transition.
To see the above code in action, click on ContainerAnimation.